Categories
Embarking on a DIY kitchen island project is an exciting endeavor that greatly enhances your culinary space’s functionality and style․ These projects offer a unique opportunity to personalize your kitchen, adding both value and a custom touch․
Numerous free kitchen island plans are readily available online, often in PDF format․ These plans include material lists, detailed instructions, and can be easily modified․ Many are designed for various skill levels, ensuring a project for everyone․
The allure of a DIY kitchen island lies in its capacity to transform a kitchen into a more functional and personalized space․ These projects present a fantastic opportunity for homeowners to create a central hub tailored to their specific needs and design preferences, often on a budget․ With a plethora of free plans readily available, anyone can embark on building their own kitchen island, regardless of prior woodworking experience․ These plans detail all the steps, from initial design to final assembly․ This accessibility empowers individuals to not only enhance their homes but also to develop new skills and enjoy the satisfaction of creating something with their own hands․ The beauty of DIY projects like kitchen islands is that they can be customized to fit various needs, whether it’s additional storage, extra counter space, or a breakfast bar․ The possibilities are as endless as your imagination, making DIY kitchen islands an ideal venture for those seeking to inject personal style and functionality into their homes․
The internet is a treasure trove of resources for DIY enthusiasts, particularly when it comes to kitchen islands, with numerous free PDF plans readily available․ These plans are a fantastic starting point for anyone looking to build their own kitchen island without the expense of hiring a professional․ The free PDF format makes it easy to download, print, and follow the instructions, which often include detailed diagrams, material lists, and step-by-step guides․ These plans cater to varying skill levels, from beginner to advanced, ensuring that everyone can find a project that suits their abilities․ The abundance of free options allows individuals to explore different designs and layouts, encouraging customization to fit unique kitchen spaces and aesthetic preferences․ With a little research, one can discover plans for islands with storage, seating, or unique features like a built-in trash can․ This accessibility to free resources makes building a kitchen island a very achievable goal for many homeowners seeking to enhance their homes․

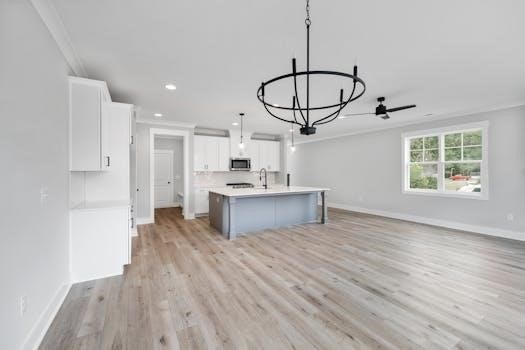
DIY kitchen island designs offer a wide range of styles․ Popular choices include farmhouse, rustic, and contemporary designs․ Islands with storage and seating options are also very common․

The farmhouse kitchen island style is a highly sought-after design, known for its rustic charm and functional appeal․ These islands often feature a robust construction with elements like exposed wood, shiplap siding, and a distressed finish that evokes a sense of warmth and timelessness․ Many farmhouse island plans include ample storage solutions such as open shelving, drawers, and cabinets, catering to both display and practical needs․ The designs commonly incorporate a large countertop, ideal for meal preparation and casual dining, creating a central hub for the kitchen area․ The style often includes seating options, such as bar stools, promoting a communal atmosphere․ Farmhouse islands are not only functional but also serve as a statement piece, enhancing the aesthetic of the entire kitchen․ The style blends seamlessly with both traditional and transitional kitchen decors, making it a versatile choice for many homeowners looking to create a welcoming and functional space․ A key feature of this style is its adaptability, allowing for various customizations to suit individual needs and preferences․
Free kitchen island plans also cater to those seeking a blend of rustic charm and contemporary sleekness․ These designs often incorporate natural materials like wood with clean lines and modern finishes․ Rustic elements might include reclaimed wood or live edge countertops, providing a unique, organic feel․ Conversely, contemporary aspects are introduced through features such as smooth, painted surfaces, stainless steel accents, and minimalist hardware․ The fusion of these contrasting styles creates a visually striking and highly functional kitchen island․ Many of these plans feature a balance of open and closed storage, allowing for both display and concealed organization․ The designs range from simple, straightforward builds to more intricate pieces, offering options for various skill levels․ Such islands are not only practical but also serve as a centerpiece that enhances the aesthetic of any kitchen․ They provide a versatile platform that complements different decor styles, from traditional to ultra-modern․ The combination of rustic and contemporary elements ensures that the island is both stylish and timeless, adding a unique character to the heart of the home․
Many free kitchen island plans prioritize both storage and seating, making them a highly functional addition to any kitchen․ These designs often include a combination of drawers, cabinets, and open shelving to maximize storage capacity․ Drawers are perfect for utensils and smaller items, while cabinets can house larger cookware or pantry staples․ Open shelves provide easy access to frequently used items or can be used to display decorative pieces․ Seating is typically integrated through an overhang on one side of the island, accommodating bar stools or chairs․ This creates a casual dining or gathering area within the kitchen․ Some plans also include features such as built-in wine racks or pull-out trash bins, further enhancing functionality․ The designs range from compact islands suitable for smaller kitchens to larger, more elaborate models perfect for spacious areas․ These islands are not only practical but also serve as a central hub for meal preparation, dining, and socializing․ The combination of storage and seating makes them an indispensable feature for any modern kitchen, optimizing both space and utility․ They transform the kitchen into a more versatile and welcoming environment․

Many free plans offer step-by-step instructions, guiding users through each stage of the building process․ These instructions often include detailed diagrams and measurements, making the project more manageable․
Plans typically list all necessary tools and materials, ensuring builders are well-prepared․ Common tools include saws, drills, and measuring equipment․ Materials may include lumber, screws, and finishing supplies․

Various assembly methods, such as pocket hole joinery, are often detailed, along with advice on finishing techniques․ Proper assembly ensures stability, while finishing enhances the island’s appearance and durability․
Free DIY kitchen island plans often provide detailed, step-by-step instructions, designed to guide both novice and experienced builders through the entire construction process․ These instructions usually begin with preparing the necessary materials and making precise cuts according to the plan’s specifications․ The plans meticulously outline each stage, from assembling the frame to attaching the countertop․ Visual aids, such as diagrams and pictures, are frequently included to clarify each step, ensuring a smooth and error-free build․ The instructions also emphasize the importance of accurate measurements and proper joinery techniques to achieve a stable and durable final product․ Furthermore, these guides often offer tips and tricks to overcome common challenges, making the building experience less daunting․ Specific techniques, such as using a Kreg Jig for pocket holes, are clearly explained, with options for alternative methods as well․ The plans also cover the sequence of assembly, specifying which pieces to attach first and how to properly align them․ This structured approach ensures that the island is built correctly, minimizing the chance of mistakes that could lead to structural issues․ The instructions are typically presented in a logical order, making it easy for builders to follow along without confusion․ By adhering to these detailed step-by-step guides, individuals can confidently create a functional and stylish kitchen island․
Embarking on a DIY kitchen island project requires a specific set of tools and materials, which are typically detailed in free PDF plans․ Common tools often include a table saw, used for making accurate cuts, especially for ripping planks to the correct width․ A miter saw can also be helpful for crosscuts and creating precise angles․ For assembly, a drill or impact driver is essential, along with a Kreg Jig for creating pocket holes for stronger joints․ Additionally, you’ll need measuring tools such as a tape measure and square, and safety equipment like safety glasses and gloves are also necessary․ Material lists usually include lumber of various sizes like 2x4s, 1x6s, and plywood for the frame, shelves, and drawers․ Screws of different sizes such as 2 1/2 inch pocket hole screws, and wood filler may also be required․ Depending on the desired finish, you might need sandpaper, paint or stain, and varnish or polyurethane․ For a smooth top, you may opt for 1×6 boards, while 2×6 boards provide a more rustic look․ Some designs also incorporate hardware like drawer slides and cabinet hinges․ The specific tools and materials are tailored to each plan, ensuring builders have a clear understanding of what they need before starting the project, making preparation easier․ Having all these listed before you start is key․
The assembly of a DIY kitchen island, as guided by free PDF plans, often involves using pocket hole joinery for a robust and clean structure; A Kreg Jig is frequently employed to create these hidden joints, which are secured with 2 1/2 inch pocket hole screws․ Alternatively, standard 2 1/2 inch star bit screws can be used for assembly, though they may require filling with wood filler for a smooth appearance․ It’s essential to follow the specific assembly instructions provided in the plans, starting with the base frame and then adding the sides, shelves, and drawers․ For a more refined look, using 1×6 boards for the top results in a smoother surface, whereas 2×6 boards create a more rustic aesthetic․ Finishing typically includes sanding all surfaces thoroughly before applying paint, stain, or varnish․ The choice of finish depends on the desired look and the style of the kitchen․ Some may prefer to paint their island a solid color, while others might opt for a wood stain to highlight the natural grain․ A final coat of polyurethane or varnish provides added protection and durability․ Proper curing time for all finishes is also critical, ensuring longevity․ The finishing process is very important to guarantee a professional and high-quality end product, enhancing both the beauty and functionality of the DIY kitchen island․